Aegex builds a cross-platform app to monitor sensors in hazardous work environments
<< Previous Next >>
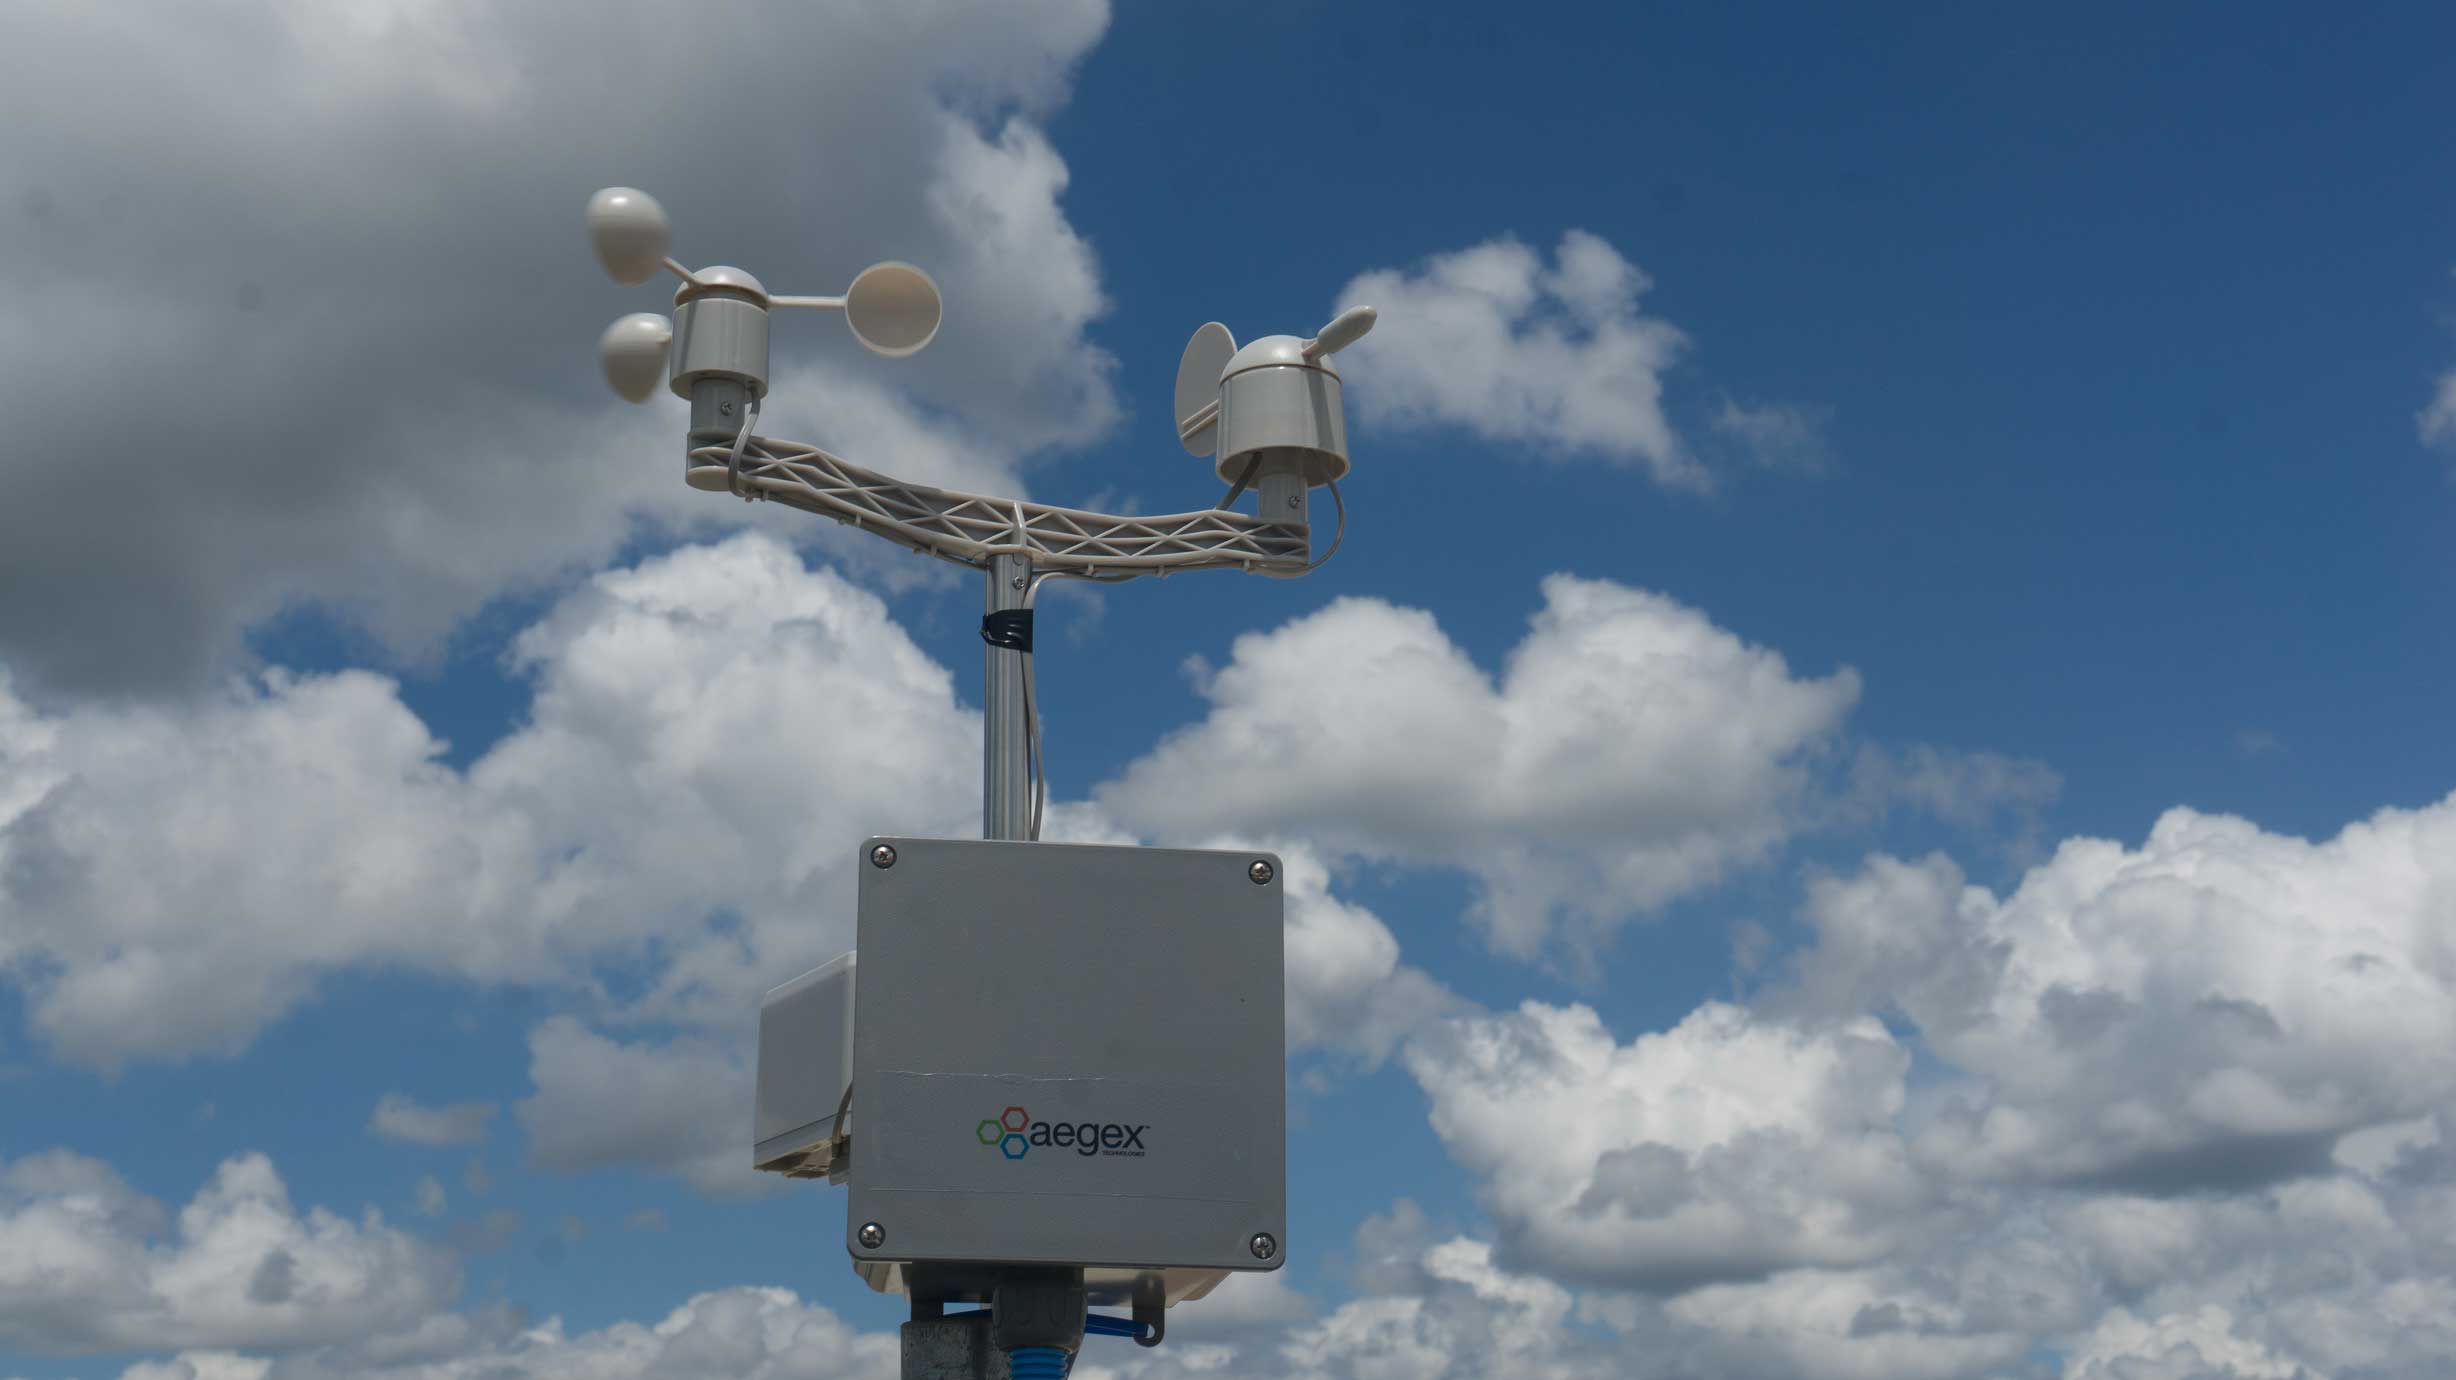
Aegex Technologies provides the first Windows 10 tablet that is globally certified as intrinsically safe for use in the most hazardous industrial locations in the world. Together with Microsoft, Aegex built a Xamarin application that customers can use to monitor real-time sensor data from IoT devices. When put into production, Aegex is hopeful this system will attract Fortune 100 customers in oil and gas, mining, and other potentially hazardous industries with the goal of saving lives. Key technologies used:
Project team:- Tom Ventulett – CEO, Aegex
- Kristin Ottofy – Technical Evangelist, Microsoft
- Joe Raio – Technical Evangelist, Microsoft
- Blain Barton – Technical Evangelist, Microsoft
- Dave Voyles – Technical Evangelist, Microsoft
- Ian Philpot – Development Lead, Technical Evangelist, Microsoft
- David Crook – Development Lead, Technical Evangelist, Microsoft
Customer profile
Problem statement
Aegex is devoted to protecting workers in hazardous locations—oil rigs or mines, for example—where people are in proximity to hazardous materials such as flammable liquids or toxic gases. Aegex has developed a certified intrinsically safe tablet for use in those environments and needed a low-cost, scalable, and efficient platform that allows users to interact with and manage their settings. They first experimented by placing an IoT infrastructure using Raspberry Pi devices and all sorts of sensors at the Guardian Centers in Perry, GA, where they could collect real-time gas, flame, weather, and other crucial pieces of data. Microsoft has helped expand on the application by providing a Raspberry Pi prototype that connects to Azure and displays data onto a Xamarin app.
Expected results and outcome
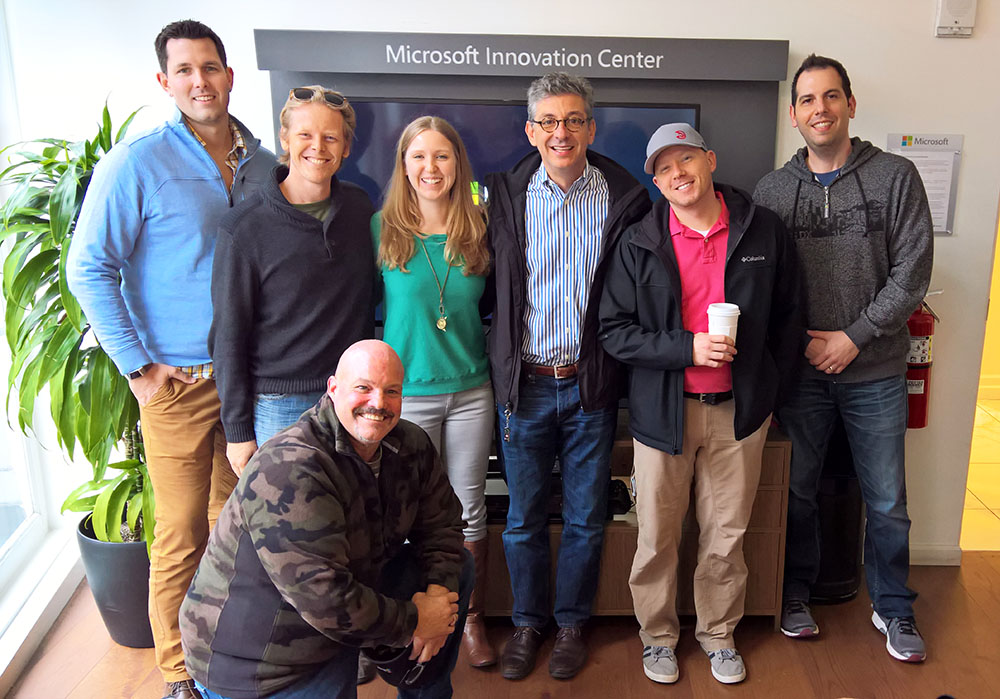
Microsoft’s goal was to deliver a working Xamarin application for production that displayed real-time data collected from sensors in a workplace. The project team built an IoT solution with a Raspberry Pi device and sensors from the Microsoft Innovation Center in Atlanta. This solution uses Windows 10 IoT Core and Azure IoT Hub to send messages to the cloud. An Azure function activates on a new message in the hub and executes a command to store this data in a scalable SQL database. Finally, a Xamarin app using HockeyApp pulls the data and displays on multiple platforms including Windows, iOS, and Android.Solution, steps, and delivery
There were several parts to this project, all of which were worked on concurrently to bring together a three-part solution.
Xamarin
Xamarin is a cross-platform C# framework for creating applications. It isn’t limited to mobile devices either, because it can also export to Microsoft’s Universal Windows Platform (UWP), as well as the Apple Mac operating system, OS X. Perhaps the greatest benefit of Xamarin is the large code re-use that it allows for. Until recently, developers needed to create unique applications for each mobile platform and write those apps in the platform’s native language. In the case of iOS, it would be Objective-C or Swift, Java or C++ for Android, and C# or C++ for Windows Mobile. Even better, Xamarin.Forms allows developers to write platform-specific code in its respective project, but most UI can be shared within a single set of files. Forms is a new library that enables you to build native UIs for iOS, Android, and Windows from a single, shared C# code base. It provides more than 40 cross-platform controls and layouts that are mapped to native controls at runtime, which means your user interfaces are fully native. The solution here had to fulfill three requirements:- Run the mobile application on multiple platforms (iOS, Android, Windows).
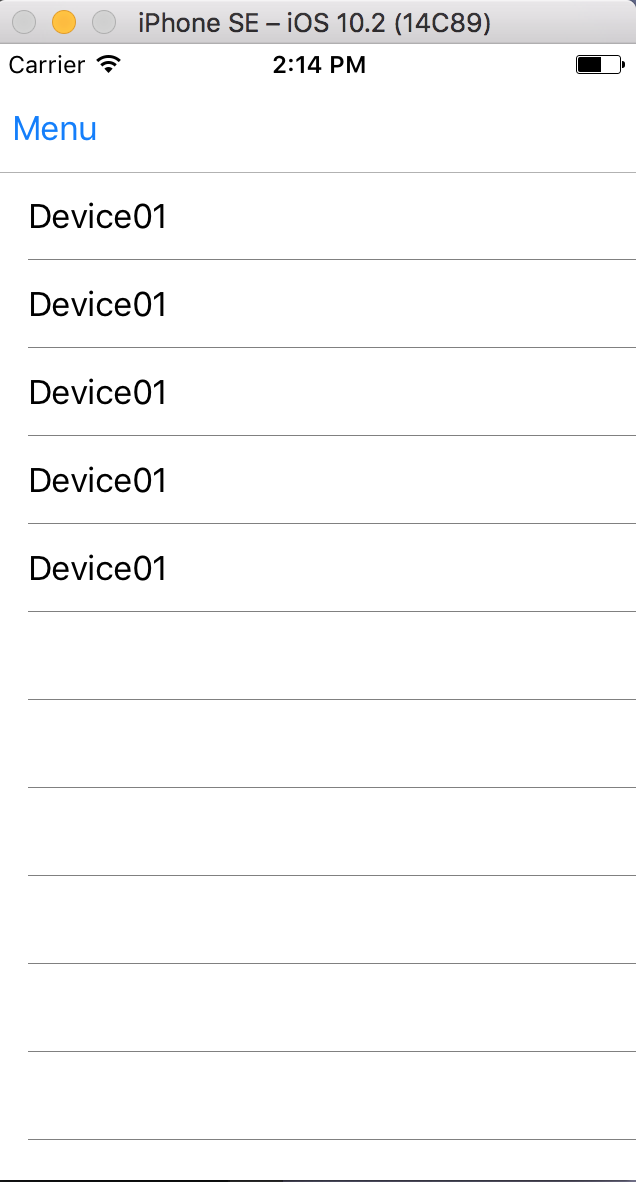
- Display a listview of the current sensors.
- Display data from each of the sensors.
- Landing page, which draws the name of each IoT sensor.
- Details page, which offers a more in-depth analysis of each sensor.
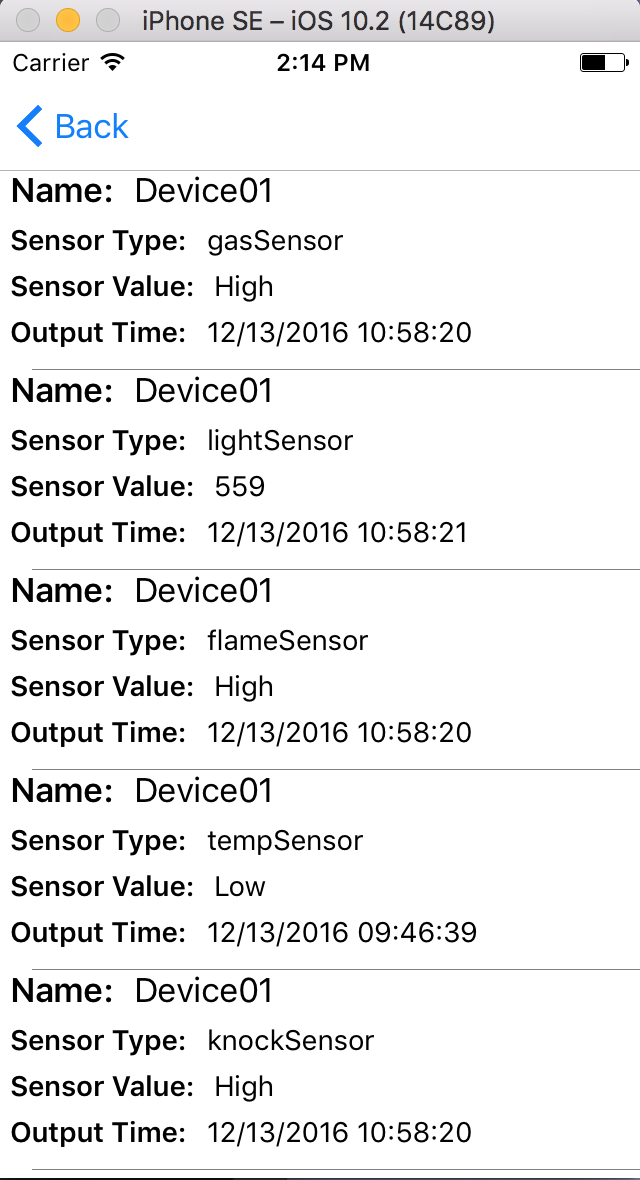
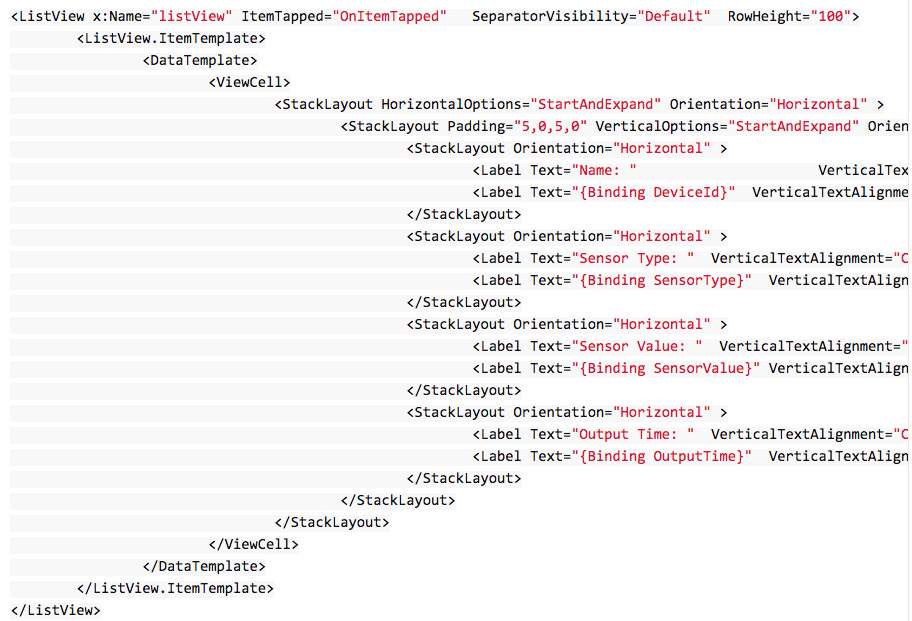 We used a StackLayout to display each sensor value as a label, which is essentially text. For example, in the first label we have the DeviceId, followed by the SensorType. A StackLayout does nothing more than allow us to lay objects, whether they are text, buttons, or images, adjacent to one another. This layout can be horizontal, which is what we are doing for our phone app, but could also be vertical, which would be appropriate for a widescreen device.
The Azure function serves JSON, which is parsed with Newtonsoft.Json in the Xamarin application, and drawn to the screen via XAML.
Of note, the variable
We used a StackLayout to display each sensor value as a label, which is essentially text. For example, in the first label we have the DeviceId, followed by the SensorType. A StackLayout does nothing more than allow us to lay objects, whether they are text, buttons, or images, adjacent to one another. This layout can be horizontal, which is what we are doing for our phone app, but could also be vertical, which would be appropriate for a widescreen device.
The Azure function serves JSON, which is parsed with Newtonsoft.Json in the Xamarin application, and drawn to the screen via XAML.
Of note, the variable _sDomain in the LandingPage.xaml.cs file is the URL from the GetCurrentSensorValues Azure function.
 Navigation
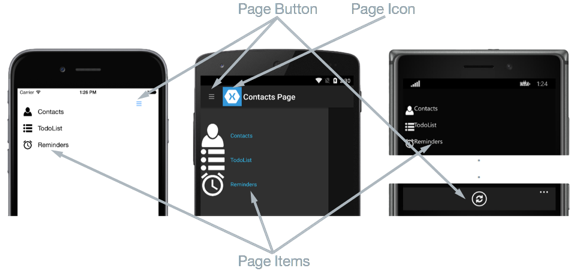
The navigation is set up in such a way that it uses the hamburger menu button, which allows the user to easily move between pages (screens). As projects grow in complexity, more pages will be necessary, so we accounted for that by allowing the user to get to any page with two button presses.
Thomas Wolf has a fantastic series of tutorials around Xamarin on his blog, and our team found his work on creating a hamburger menu in Xamarin.Forms to be particularly useful.
As he states, “Xamarin has cleverly disguised their implementation as “Master-Detail Page“, which manages two related pages of information—a master page that presents items, and a detail page that presents details about items on the master page.
Navigation
The navigation is set up in such a way that it uses the hamburger menu button, which allows the user to easily move between pages (screens). As projects grow in complexity, more pages will be necessary, so we accounted for that by allowing the user to get to any page with two button presses.
Thomas Wolf has a fantastic series of tutorials around Xamarin on his blog, and our team found his work on creating a hamburger menu in Xamarin.Forms to be particularly useful.
As he states, “Xamarin has cleverly disguised their implementation as “Master-Detail Page“, which manages two related pages of information—a master page that presents items, and a detail page that presents details about items on the master page.
 All of our menu navigation is handled from MenuPageViewModel.cs, where we create a new function and ICommand for each new page we’d like to implement, to which the user can then navigate.
public class MenuPageViewModel {
public ICommand GoHomeCommand { get; set; }
public ICommand GoSettingsCommand { get; set; }
public MenuPageViewModel() {
GoHomeCommand = new Command(GoHome);
GoSettingsCommand = new Command(GoSettings);
}
void GoHome(object obj) {
App.NavigationPage.Navigation.PopToRootAsync();
App.MenuIsPresented = false;
}
void GoSettings(object obj) {
App.NavigationPage.Navigation.PushAsync(new SettingsPage());
App.MenuIsPresented = false;
}
}
Future aspirations for Xamarin
The goal for this application was for the product to work with Aegex’s tablets primarily so employees can have the benefits of an intrinsically safe device on which to view the data in their potentially hazardous environment.
Additionally, other devices may need access to the app, such as if an employee is offsite and does not have access to a tablet. This application supports iOS, Android, and Windows, so the range of devices supported and number of people who can access the information is broad. This will allow customers flexibility in choosing devices for their teams and perhaps allow for cost-savings if the company already has purchased devices.
The future plan is to enable a login function to enhance security and add more features such as displaying data more cleanly, including graphs and charts, ideally from a service such as Power BI. This is possible with Xamarin’s built-in WebView component, which allows the developer to access webpages within the application by embedding the device’s native browser via a Xamarin control. Other goals are to add maps to view device locations, including altitude, and display wind patterns.
HockeyApp
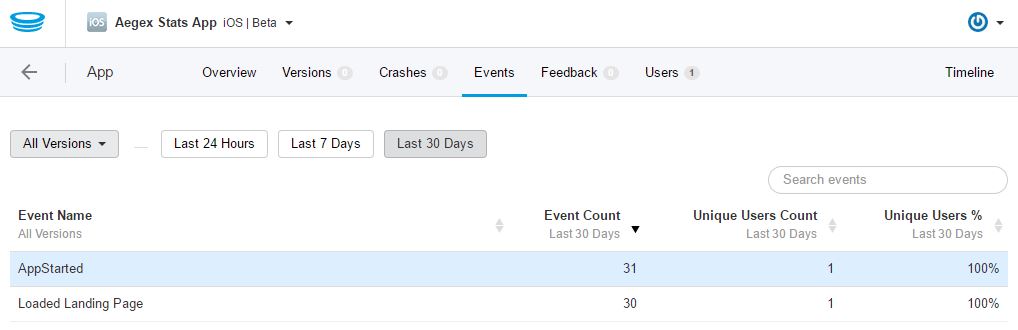
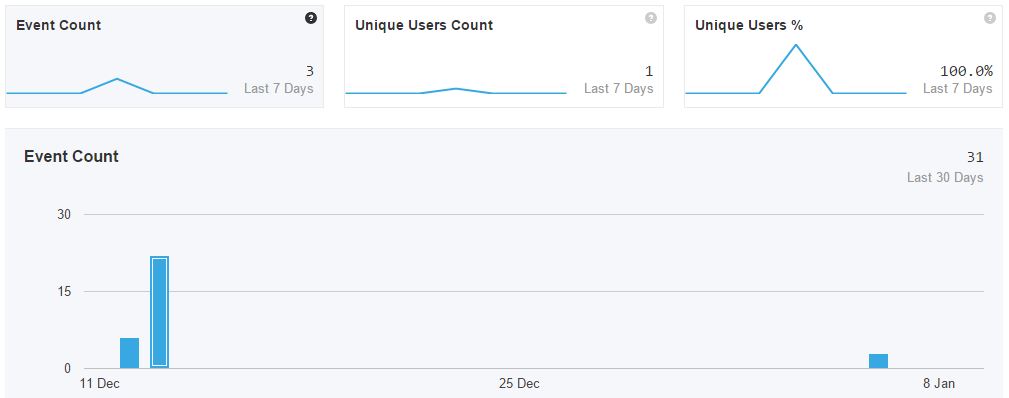
HockeyApp is a service for app developers to support them in various aspects of their development process, including the management and recruitment of testers, the distribution of apps, and the collection of crash reports.
For this application, HockeyApp was used to create custom events, which allowed for firing notification to an event hub each time that custom event was triggered. This could be used for something as simple as notifying the dashboard each time fresh data was retrieved from the Azure function, or how long it took to load a specific page.
All of our menu navigation is handled from MenuPageViewModel.cs, where we create a new function and ICommand for each new page we’d like to implement, to which the user can then navigate.
public class MenuPageViewModel {
public ICommand GoHomeCommand { get; set; }
public ICommand GoSettingsCommand { get; set; }
public MenuPageViewModel() {
GoHomeCommand = new Command(GoHome);
GoSettingsCommand = new Command(GoSettings);
}
void GoHome(object obj) {
App.NavigationPage.Navigation.PopToRootAsync();
App.MenuIsPresented = false;
}
void GoSettings(object obj) {
App.NavigationPage.Navigation.PushAsync(new SettingsPage());
App.MenuIsPresented = false;
}
}
Future aspirations for Xamarin
The goal for this application was for the product to work with Aegex’s tablets primarily so employees can have the benefits of an intrinsically safe device on which to view the data in their potentially hazardous environment.
Additionally, other devices may need access to the app, such as if an employee is offsite and does not have access to a tablet. This application supports iOS, Android, and Windows, so the range of devices supported and number of people who can access the information is broad. This will allow customers flexibility in choosing devices for their teams and perhaps allow for cost-savings if the company already has purchased devices.
The future plan is to enable a login function to enhance security and add more features such as displaying data more cleanly, including graphs and charts, ideally from a service such as Power BI. This is possible with Xamarin’s built-in WebView component, which allows the developer to access webpages within the application by embedding the device’s native browser via a Xamarin control. Other goals are to add maps to view device locations, including altitude, and display wind patterns.
HockeyApp
HockeyApp is a service for app developers to support them in various aspects of their development process, including the management and recruitment of testers, the distribution of apps, and the collection of crash reports.
For this application, HockeyApp was used to create custom events, which allowed for firing notification to an event hub each time that custom event was triggered. This could be used for something as simple as notifying the dashboard each time fresh data was retrieved from the Azure function, or how long it took to load a specific page.
 We created a simple template to allow for making changes to HockeyApp for future projects, too. In Helpers/Settings.cs, you will find that we only need to swap out the HockeyApp ID to connect to a different HockeyApp account.
public static class Settings
{
// HockeyApp App IDs, we have one for each supported platform
#if WINDOWS_UWP
public static string HockeyAppId = "1c52884e1fdf4977ba1e2ca004c0b59c";
#elif __ANDROID__
public static string HockeyAppId = "3768986591c5474b935eba71cc2957ca";
#elif __IOS__
public static string HockeyAppId = "368f3b4462bb4126b95d3444fee9d72b";
#endif
}
That helpers folder also has another class, CrossHelpers.cs, for returning the proper location for hardcoded resource images:
public static class CrossHelper
{
///
/// Returns the proper location for hardcoded resource images loaded from local files.
/// This is needed since Device.OnPlatform doesn't support detection of the "Windows" OS
/// for scenarios that use Windows 10/UWP or Windows 8.1.
///
/// This helper function assumes that images are all named the same across platforms,
/// and are located in the following folders:
/// - iOS: BundleResource in Resources folder
/// - Android: AndroidResource in Resources/Drawable folder
/// - Windows: Content in Assets folder
///
///The filename of the image we need to load from file. /// The full name image path and file name.
public static string GetOSFullImagePath(string filename)
{
switch (Device.OS)
{
case TargetPlatform.iOS:
return filename;
case TargetPlatform.Android:
return filename;
case TargetPlatform.Windows:
return "Assets/" + filename;
case TargetPlatform.WinPhone:
// Not supported in this project, but just in case
return "Assets/" + filename;
case TargetPlatform.Other:
// Not supported in this project, but just in case
return filename;
default:
return filename;
}
}
}
Each platform (iOS, Android, Windows) loads assets from different folders and also has strict naming conventions. To make things easier, that can be abstracted away with this class.
We created a simple template to allow for making changes to HockeyApp for future projects, too. In Helpers/Settings.cs, you will find that we only need to swap out the HockeyApp ID to connect to a different HockeyApp account.
public static class Settings
{
// HockeyApp App IDs, we have one for each supported platform
#if WINDOWS_UWP
public static string HockeyAppId = "1c52884e1fdf4977ba1e2ca004c0b59c";
#elif __ANDROID__
public static string HockeyAppId = "3768986591c5474b935eba71cc2957ca";
#elif __IOS__
public static string HockeyAppId = "368f3b4462bb4126b95d3444fee9d72b";
#endif
}
That helpers folder also has another class, CrossHelpers.cs, for returning the proper location for hardcoded resource images:
public static class CrossHelper
{
///
/// Returns the proper location for hardcoded resource images loaded from local files.
/// This is needed since Device.OnPlatform doesn't support detection of the "Windows" OS
/// for scenarios that use Windows 10/UWP or Windows 8.1.
///
/// This helper function assumes that images are all named the same across platforms,
/// and are located in the following folders:
/// - iOS: BundleResource in Resources folder
/// - Android: AndroidResource in Resources/Drawable folder
/// - Windows: Content in Assets folder
///
///The filename of the image we need to load from file. /// The full name image path and file name.
public static string GetOSFullImagePath(string filename)
{
switch (Device.OS)
{
case TargetPlatform.iOS:
return filename;
case TargetPlatform.Android:
return filename;
case TargetPlatform.Windows:
return "Assets/" + filename;
case TargetPlatform.WinPhone:
// Not supported in this project, but just in case
return "Assets/" + filename;
case TargetPlatform.Other:
// Not supported in this project, but just in case
return filename;
default:
return filename;
}
}
}
Each platform (iOS, Android, Windows) loads assets from different folders and also has strict naming conventions. To make things easier, that can be abstracted away with this class.
Azure Functions
We used Azure Functions to monitor the data being sent up to Azure IoT Hub. The custom function triggers every time a new message is received. As they arrive, they are retrieved, then inserted into an Azure SQL database. By doing this, the data is permanently stored and can be used in the future with tools such as Power BI. By using the Azure IoT hub to receive messages and the Azure function to process them, the customer is able to scale up to receive a large volume of messages from many different devices concurrently. As the message volume increases, more Azure Functions instances will be dynamically added to process each message. This is done automatically as they were set up using a Consumption Plan. The same goes for when the volume of messages drops. The number of instances will scale down accordingly. By taking advantage of Azure Functions’ serverless code architecture, Aegex does not have the complexity of managing a virtual machine. This also results in significant cost savings.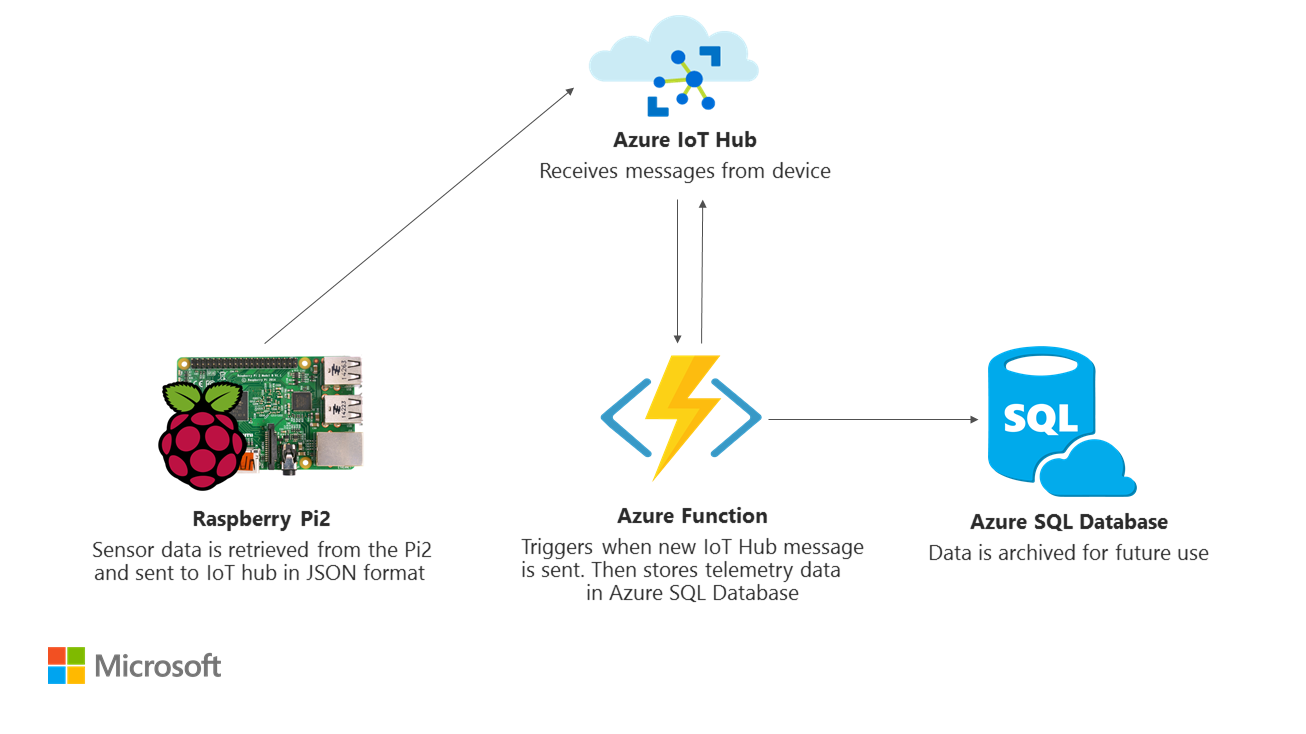 Two C# Azure functions are used in order to process received messages in the IoT hub from the device and to send the data as a JSON message to store in the Azure SQL database. The function must have the variable
 SensorReadingContext declared in the Application Settings. The code is available here.
The function SensorReadingtoSQL uses the IoT hub endpoint for its event hub found in the Operations Monitoring blade in Azure. The downfall here is that using an external monitor such as Device Explorer is now disabled because the Azure function has taken over as the primary watcher. To overcome this, you can use custom IoT Hub Routing Endpoints.
The function SensorReadingtoSQL needs the endpoint variable iothubconnection declared in Application Settings. Additionally, the name of the hub must be updated in the function.json file for the variable path.
The function GetCurrentSensorValues returns the latest values grouped by each sensor type in a JSON format. The Xamarin application performs a GET request against the public URL to receive these values, which are then displayed in the application. By using an Azure function, we eliminate the need to set up a separate standalone Web API website.
Below is an example of returned values:
{"Id":3165,"DeviceId":"Device01","SensorType":"Pressure","SensorValue":"97850.95 Pa","OutputTime":"2017-01-20T10:50:23"},{"Id":226,"DeviceId":"Device02","SensorType":"knock","SensorValue":"High","OutputTime":"2017-01-19T15:55:36"},{"Id":2874,"DeviceId":"Device03","SensorType":"flame","SensorValue":"High","OutputTime":"2017-01-19T17:06:55"},{"Id":3168,"DeviceId":"Device04","SensorType":"Temperature","SensorValue":"22.87645 deg C","OutputTime":"2017-01-20T10:50:24"},{"Id":3166,"DeviceId":"Device05","SensorType":"Altitude","SensorValue":"293.3611 m","OutputTime":"2017-01-20T10:50:24"},{"Id":3167,"DeviceId":"Device06","SensorType":"gas","SensorValue":"High","OutputTime":"2017-01-20T10:50:24"}
Internet of Things
The initial prototype was built using Windows 10 IoT Core installed on a Raspberry Pi 2 with the following sensors connected:- Keyes KY-036 Metal Touch Sensor
- Keyes K869051 Gas Sensor
- Keyes KY-026 Flame Sensor
- Keyes KY-031 Knock Sensor
- Adafruit BMP280 Barometric Pressure + Temperature Sensor
- Keyes KY-028 Light Sensor
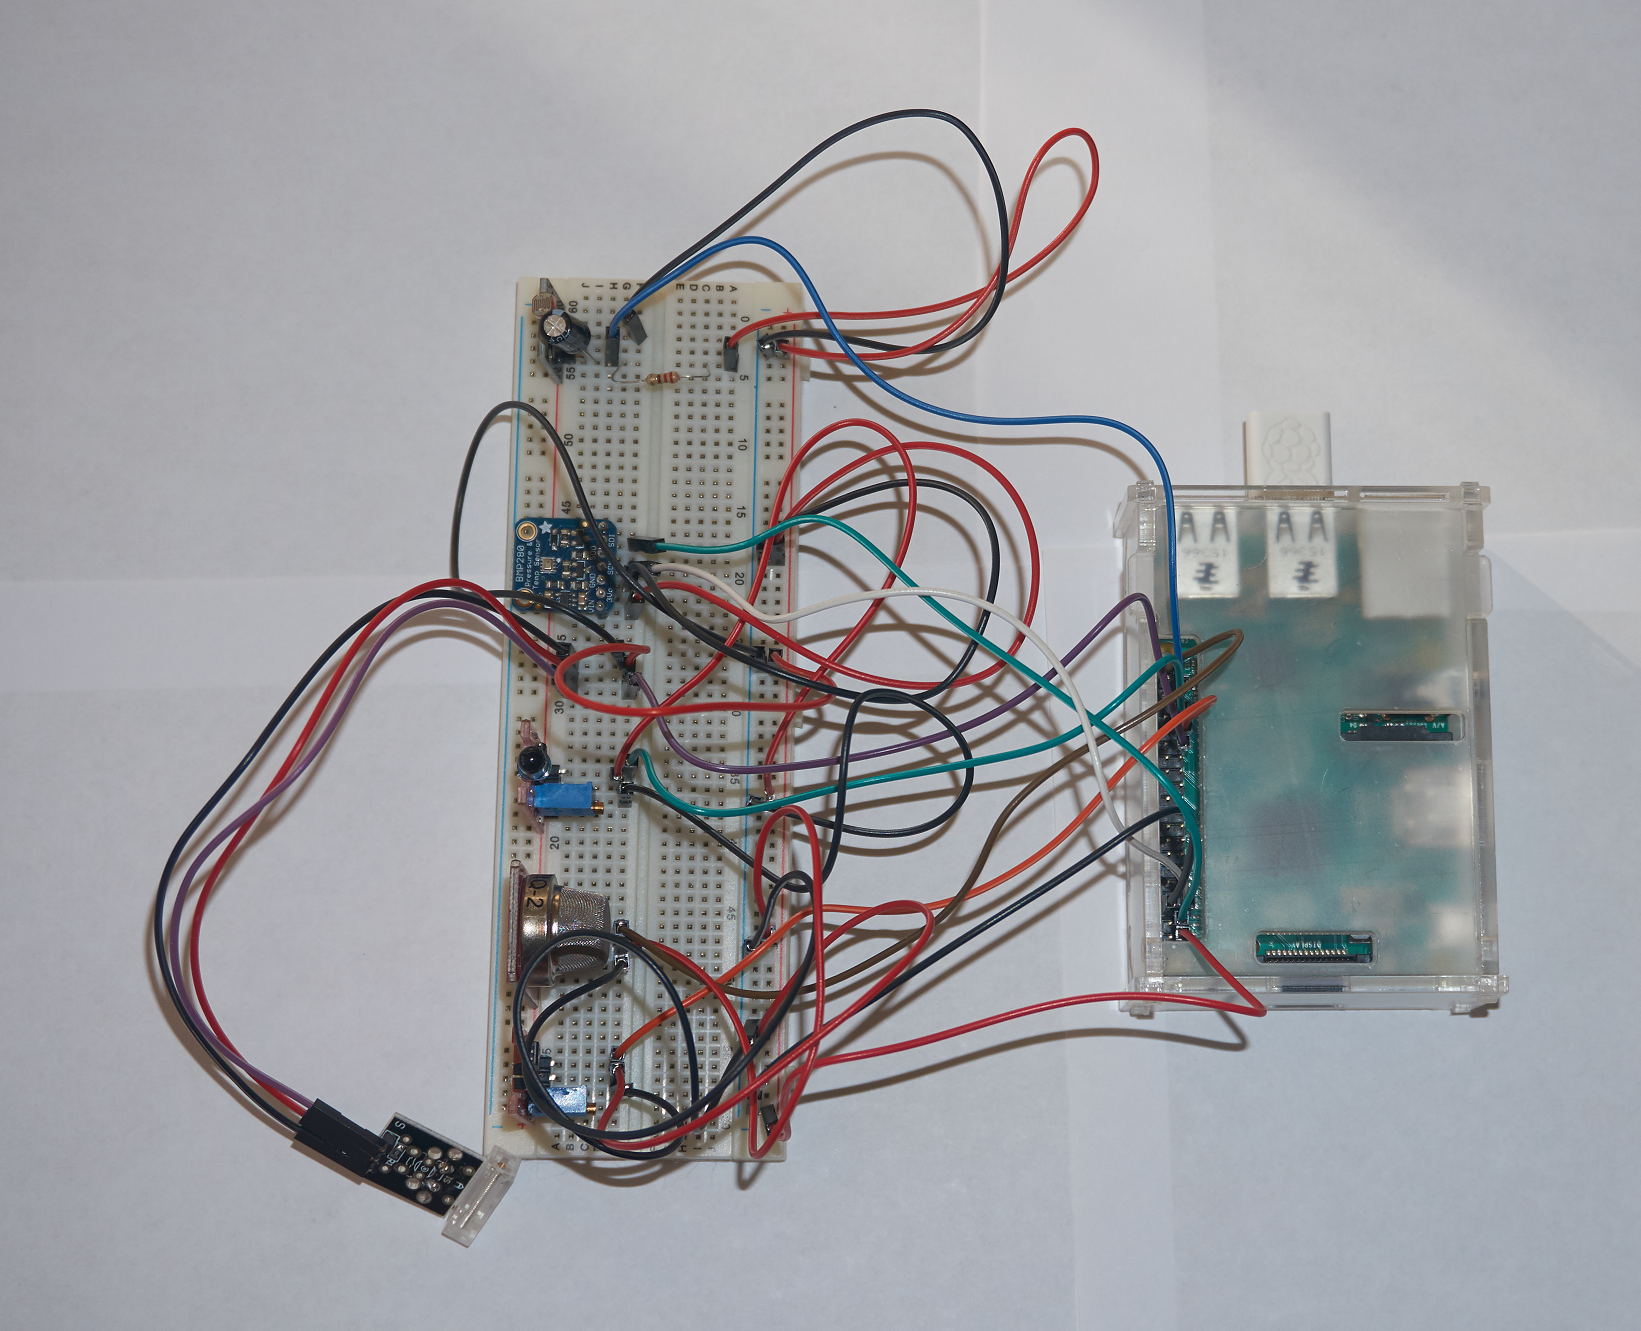
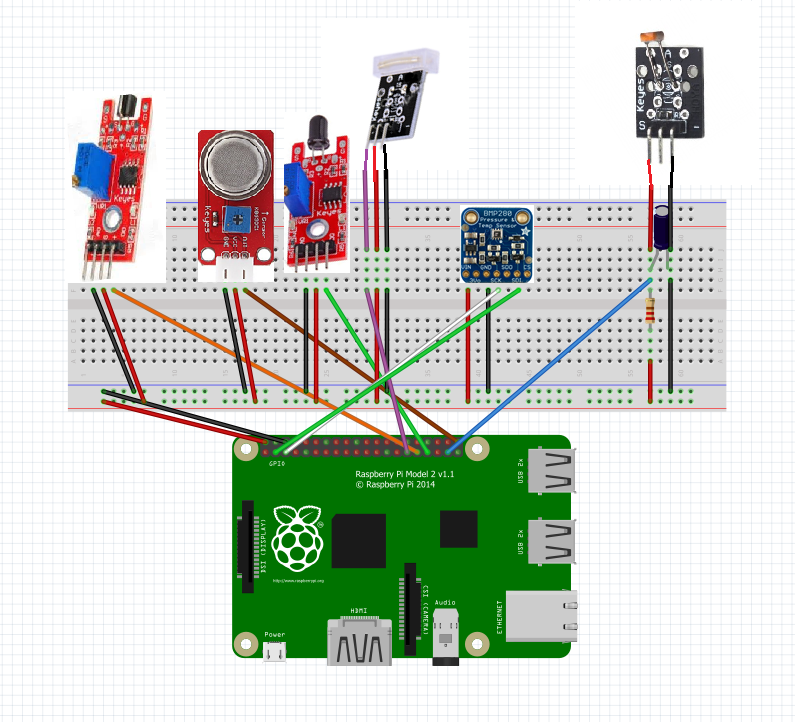 The software running on a Raspberry Pi 2 Model B V1.1 with 1 GB of RAM is a C#/XAML Universal Windows Platform app with the Windows IoT Extension SDK running Windows 10 IoT Core version 10.0.14393.576. This SDK allowed the device to access the GPIO pins to manage the input and output of the sensors. Windows 10 IoT Core was chosen to extend on Aegex’s already implemented structure and desire to continue with the Windows brand. A Raspberry Pi was chosen for the same reasons and because of the integration support with Microsoft technologies.
Timers are enabled to collect and send data only when necessary. For instance, only if a fire is detected does a notification get sent regarding the flame sensor. Updates to the flame sensor may also take into consideration heat (temperature) because the flame sensor will also pick up normal rays from the sun or indoor lighting before sending.
Other data is collected and sent every 2 seconds currently. The messages are sent from the device to the cloud, permitting Internet connection. The code is available here.
Below is the code for the timer using a DispatcherTimer. The variable
The software running on a Raspberry Pi 2 Model B V1.1 with 1 GB of RAM is a C#/XAML Universal Windows Platform app with the Windows IoT Extension SDK running Windows 10 IoT Core version 10.0.14393.576. This SDK allowed the device to access the GPIO pins to manage the input and output of the sensors. Windows 10 IoT Core was chosen to extend on Aegex’s already implemented structure and desire to continue with the Windows brand. A Raspberry Pi was chosen for the same reasons and because of the integration support with Microsoft technologies.
Timers are enabled to collect and send data only when necessary. For instance, only if a fire is detected does a notification get sent regarding the flame sensor. Updates to the flame sensor may also take into consideration heat (temperature) because the flame sensor will also pick up normal rays from the sun or indoor lighting before sending.
Other data is collected and sent every 2 seconds currently. The messages are sent from the device to the cloud, permitting Internet connection. The code is available here.
Below is the code for the timer using a DispatcherTimer. The variable SENSOR_CHECK_TIME can be modified to increase or decrease the frequency of the sensor checks and messages sent.
sensorTimer = new DispatcherTimer();
sensorTimer.Interval = TimeSpan.FromMilliseconds(SENSOR_CHECK_TIME);
sensorTimer.Tick += Sensor_Timer_Tick;
sensorTimer.Start();
The messages from the device are sent to an Azure IoT hub via AMQP. The IoT hub allows for a scalable messaging environment in which bidirectional communication is enabled. Once the devices collect sensor data, they use the Visual Studio Connected Service for Azure IoT Hub to send JSON messages of the information. Currently, the messaging is primarily device-to-cloud.
However, there is a good opportunity here to enable cloud-to-device messaging. The IoT hub also allowed for a more secure environment in which only devices that have been properly assigned an ID and tokens can access the resource. Additionally, communication with the IoT
hub requires a SAS token, which can be granted a time-to-live, meaning it will expire after a certain amount of time and will need to be updated. Further securities measures may take place in a later phase such as updating the tokens every few minutes.
Each message contains the device ID, sensor type, sensor value, and the current date and time. The messages are taken from a string to a JSON format, then converted into an encoded ASCII byte array. The size of the messages is around 100 characters each.
A sample message looks like this:
{"DeviceId":"Device01","SensorType":"Temperature","SensorValue":"23.19229 deg C","OutputTime":"3/1/2017 4:44:54 PM"}
Here is the code for sending the messages to the IoT hub:
public static async Task SendDeviceToCloudMessageAsync(string deviceId, string sensorType, string sensorValue)
{
var deviceClient = DeviceClient.CreateFromConnectionString(deviceConnectionString, TransportType.Amqp);
var message = new Message(Encoding.ASCII.GetBytes(JSONify(deviceId, sensorType, sensorValue, DateTime.Now)));
await deviceClient.SendEventAsync(message);
}
Future aspirations for IoT
A Raspberry Pi 2 was chosen as the prototype device due to its convenience and reliability with the Windows 10 IoT Core and UWP applications. The user interface displayed on the Pi shows the latest sensor data to be sent to Azure. In the future, this can be updated to show a more robust view for easier debugging. A microcontroller such as an Arduino could have been used to gather the data and send to Azure as well and may be a viable option for future devices, although the program would likely need to be in another language and depending on the device, may not enable a user interface.
A future update to this application may be to limit the number of messages the device sends to the IoT hub per day or use a field gateway such as the Azure IoT Gateway SDK. There is also an opportunity to include device management or set up device twins in order to communicate with and control the devices easier. Currently, Azure receives 30 messages per minute plus any anomalies detected such as flame or metal touch. In production, the ideal situation may be to store this data locally on the Pi and send to Azure much more infrequently, which will be especially necessary if wireless access is intermittent. That would decrease the cost, especially if more devices are also sending data.
Costs
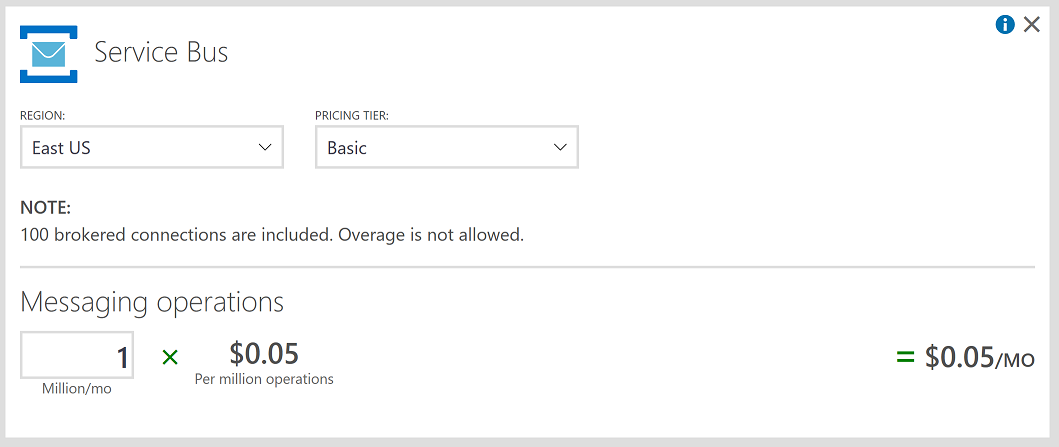
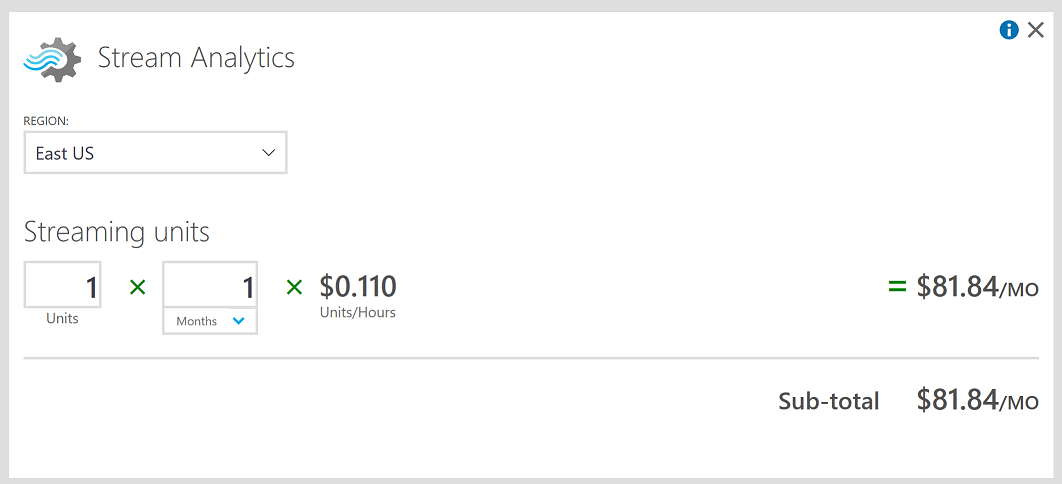
One of the reasons for choosing this solution is the potential of high ingestion of messages being sent over the cloud. By eliminating Azure Stream Analytics and an Azure Service Bus queue (where the cost would be $0.05 per million operations for a Service Bus queue plus a Stream Analytics job at $81.84 per month), Aegex would spend only $55.80 with a basic app service plan at today’s pricing.
Conclusion
Xamarin reflection
The production development team decided it is best to create a Portable Class Library (PCL) project rather than the shared project that was created for the proof of concept (POC). They will also be adding a number of features such as a login portal for individual users to see their devices.Azure Functions reflection
The Azure Functions piece was exciting! The templates that are offered when first creating a function app do not explicitly include IoT Hub monitoring to SQL ingestion. This meant the team had to do some creative work to achieve this possibly first-ever-created scenario. Below is code that writes the sensor values to SQL: SensorReading myR = new SensorReading(); myR = JsonConvert.DeserializeObject(myEventHubMessage); using (var db = new SensorReadingContext()) { db.SensorReadings.Add(myR); db.SaveChanges(); }HockeyApp reflection
HockeyApp was a bit overwhelming initially because the name spaces and API are not identical across the three platforms: iOS, Android, and Windows. Because of this, it took longer than expected to implement. Furthermore, on iOS, HockeyApp continues to throw the error The authentication token could not be stored due to a keychain error. This is a known issue and the team hopes to have it resolved with future iterations of xCode. Despite this error, HockeyApp still works, and all of our events displayed correctly in the dashboard.
Internet of Things reflection
The IoT Hub, Windows 10 IoT Core, and all of the SDKs and tools make communication between cloud and device much easier. These pieces fit together so well and this part of the project went smoothly.Future opportunities
In May 2017, Aegex plans to hold a conference for some 200 guests at the Guardian Centers in Atlanta. The goal is to share this project and future opportunities for industry in IoT. Aegex hopes to have a system developed where each attendee will be able to build their own IoT device and set out in the facility to collect real-time data. Additionally, Aegex would like to use machine learning to detect anomalies in its data and use predictive analytics to determine optimal evacuation routes, serious threats, and other necessary alerts. Upon detection, the Xamarin app would ideally notify the user that there is an issue via a push notification from Azure. Further notifications could extend to watches that employees wear for faster alerts to aid in saving lives. As for IoT, Aegex will need to have the devices certified for hazardous environments. No solution currently exists for the certifications they require at a reasonable price. Additionally, each of the sensors would need to be tested. Aegex would likely need to design its own hardware system to support these needs. Wi-Fi is also not always available in the field. Therefore, Aegex may need to partner with other companies to find a solution. A testing area at the Guardian Centers, a good location to collect potential earthquake data.